Kubernetes - Persistent Volumes
Prerequisites
- kubectl
- minikube
- Docker
Description
In this post I walk through a simple example showing how to use persitent volumes in Kubernetes to store data files used by a web application - in this case the data file is a machine learning model. Although this is not really necessary since there is no state being stored by the model itself, the same principles apply to other scenarious like databases where persistence is critical.
A note on mounts
From the minikube documentation
minikube is configured to persist files stored under the following directories, which are made in the Minikube VM (or on your localhost if running on bare metal). You may lose data from other directories on reboots.
/data
/var/lib/minikube
/var/lib/docker
/tmp/hostpath_pv
/tmp/hostpath-provisionerYou can also achieve persistence by creating a PV in a mounted host folder.
This example will use the last option - a mounted host folder.
Mount a local folder in minikube
In a Windows 10 terminal run this command (use a separate tab/terminal since the process needs to stay alive for the mount to be accessible)
minikube mount <source directory>:<target directory>
For example
minikube mount E:/folder/subfolder:/mnt
Left side of colon is the host path, and the right side is going to be the path inside minkube.
Create a Persistent Volume
apiVersion: v1
kind: PersistentVolume
metadata:
  name: models-volume
  labels:
    type: local
spec:
  storageClassName: manual
  capacity:
    storage: 2Gi
  accessModes:
    - ReadWriteOnce
  hostPath:
    path: "/mnt"
Where
nameis the name of the persistentVolume2Girepresents total storage size that will be availablepathrepresents where the volume is mounted in the clusters Node. In this case we mounted a local folder into a path/mntin the minikube VM.- access mode of
ReadWriteOncemeans the volume can be mounted as read-write by a single Node storageClassName‘manual’ is the name of the class this persistent volume belongs to, it can be anything and is just a way for persistent volume claims to bind to this volume (for example ‘gold’ might be a class name defined for storage that is backed by SSD drives for performance applications, persistentVolumeClaims that need performance volume can access such storage by binding to a volume with the ‘gold’ class name) - refer to the documentation for more details
(https://kubernetes.io/docs/concepts/storage/storage-classes/)
(https://kubernetes.io/docs/concepts/storage/persistent-volumes/#class)
Run this command to create the PersistentVolume:
kubectl apply -f persistentVolume.yamlOnce created you can view information about the PersistentVolume by running:
kubectl get pv models-volumeYou should see output like this, the status shouldbe noe be ‘available’

Create a Persistent Volume Claim
After creating the persistent volume you need to create a persistent volume claim in order to use it.
apiVersion: v1
kind: PersistentVolumeClaim
metadata:
  name: ner-pv-claim
spec:
  storageClassName: manual
  accessModes:
    - ReadWriteOnce
  resources:
    requests:
      storage: 1Gi
Where
nameis the name of the persistentVolumeClaimstorageClassNameis set to the same class of the persistent volume we want to usestoragerewuests that this claim use 1Gi if the 2Gi total storage space available
Run this command to create the persistentVolumeClaim
kubectl apply -f pvClaim.yamlThen check the information for the persistent volume, you will see that it is now bound by the ner-pv-claim
kubectl get pv models-volume
Look at the PersistentVolumeClaim:
kubectl get pvc ner-pv-claimThe output shows that the PersistentVolumeClaim is bound to your PersistentVolume, models-volume

Create a Pod
The next step is to create a Pod that uses your PersistentVolumeClaim as a volume.
In the minikube docker shell build the container.
docker build -t ner:latest .NOTE:
- If using spacy models (not your own custom trained model), We cannot use the downloaded models from spacy github repo, they need to be installed first using
python -m download spacy <modelname>, then copy it from the site-packages folder (otherwise you will get an error regarding missing lexmes.bin)
Create the deployment file that defines the pod
apiVersion: apps/v1
kind: Deployment
metadata:
  name: ner-deployment
spec:
  replicas: 1
  selector:
    matchLabels:
      ner: latest
  template:
    metadata:
      labels:
        ner: latest
    spec:
      containers:
      - name: ner-container
        image: ner:latest
        imagePullPolicy: Never
        ports:
        - containerPort: 5000
        volumeMounts:
        - mountPath: "/ner"
          name: ner-pv-storage
      volumes:
      - name: ner-pv-storage
        persistentVolumeClaim:
          claimName: ner-pv-claim
NOTE:
mountPath: "/ner"Specifies the folder in the pod that the volume will be mounted - relative to root/This is what your application sees and that is the path you must specify in the application source code that is running in the container. So if you bash into the pod shell (see below), and navigate to the root/you will see the folder/ner, that is where you will find all the contents of the hostpath
Create the pod by running
kubectl apply -f ner-deployment.yamlUse this command to watch for events in the case you have any issues.
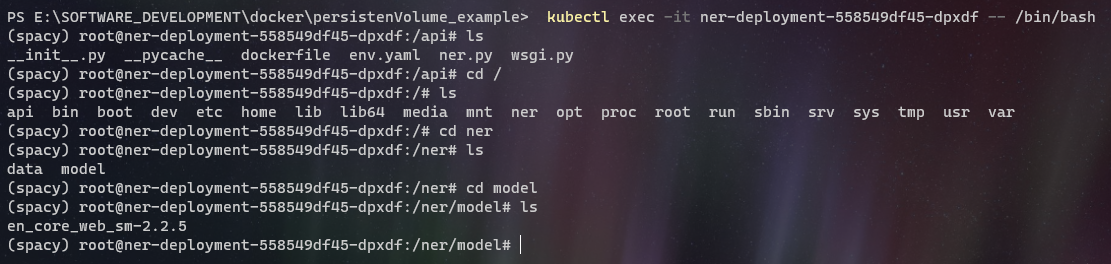
kubectl get events -wOnce pod is running get a shell into the pod using the following command. (you can find the full pod name by running kubectl get pods command)
kubectl exec -it ner-deployment-558549df45-845fg -- /bin/bashIf you navigate to the mount path /ner you will see the data and model folders.
Test the Service
Apply a nodeport service to expose the pod
kubectl apply -f .\nodeport-service.yamlkind: Service
apiVersion: v1
metadata:
name: my-service
spec:
selector:
ner: latest
ports:
- protocol: TCP
port: 5000
nodePort: 32321
type: NodePort
Get the minikube ip by running minikube ip
172.17.64.69
Use postman to send POST request to the minikube ip on port 32321 and route entities with some text in the body of message that contains a name, for example
My name is John Smith.
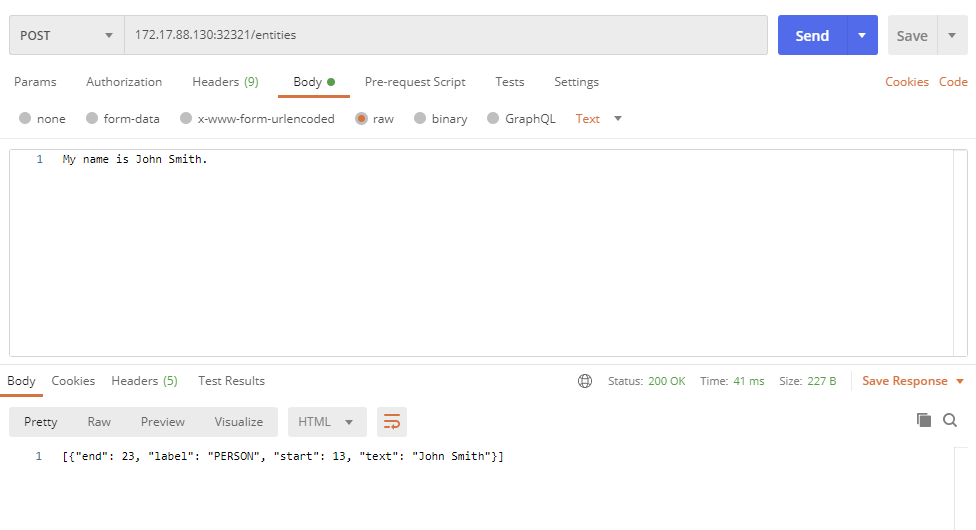
You should get back this result in the response
[{“end”: 23, “label”: “PERSON”, “start”: 13, “text”: “John Smith”}]
Remove the nodeport service since this was just for testing locally
kubectl delete -f .\nodeport-service.yamlSample Code
https://github.com/erotavlas/blog-samples/tree/master/Kubernetes-Persistent-Volumes
References
Kubernetes - Persistent Volumes
Kubernetes - Configure a Pod to Use a PersistentVolume for Storage
Salvatore S. © 2020